Building your Restomod Air A/C Kit is easy than ever. Our new “build your kit popup” assists you through the whole process. It is like having one of our technicians build it directly for you. In seven steps you can design your own complete Restomod Air kit.
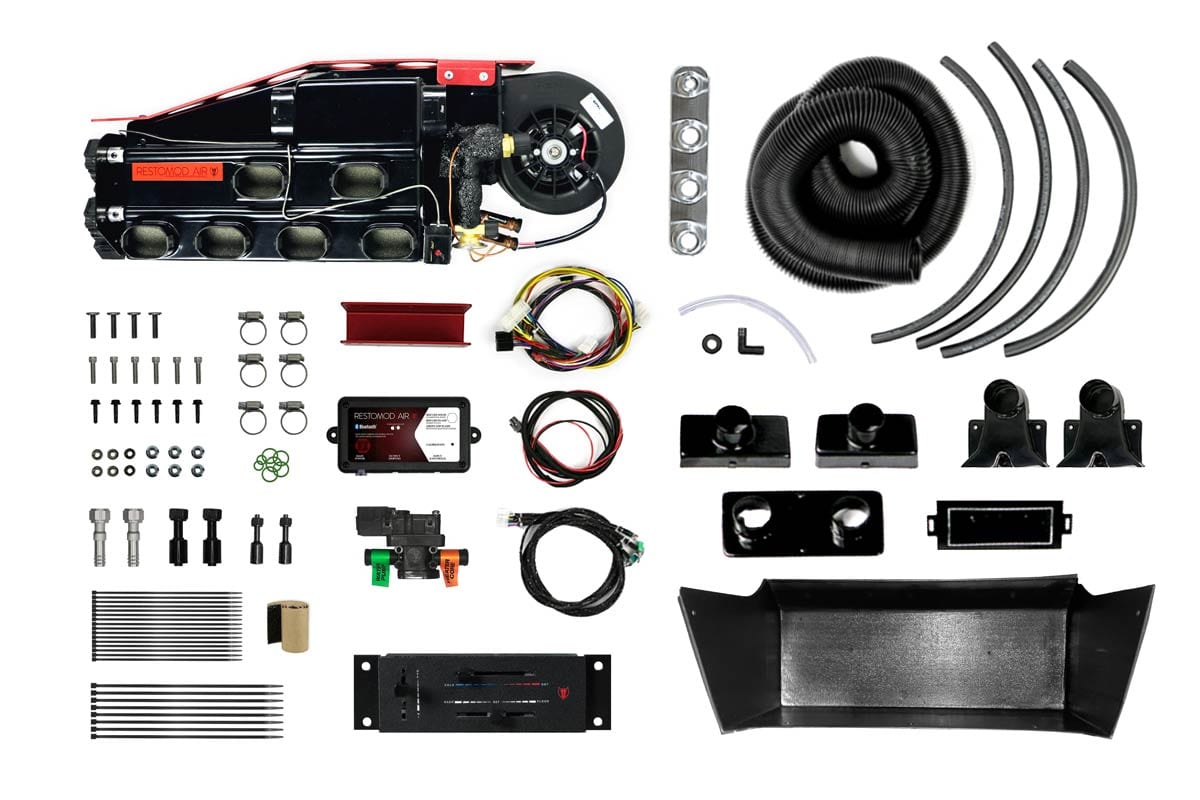
EVAPORATOR UNIT
Step 1: To start building your kit you will need to pick one of our A/C-Heat evaporator units. Choosing the correct evaporator unit is the most important step in the process. It is the heart of the system therefore we recommend choosing the largest unit that will fit in your dash cavity. Restomod Air has six evaporator sizes to pick from. We have Full-Size units to Ultra-Compact units to fit any vehicle. It does not matter what the make or model of your vehicle is, one of these six units will fit.
You will need to remove your original heater since you will be replacing it with your new Restomod Air A/C System. After removing the heater, take a rough measurement of your dash. Using the measurements displayed on each system page, find a system that best fits based on your vehicle measurement.
A/C CONTROLS
Step 2: To operate a Restomod Air A/C system you will need to pick from one of our A/C controller options. Restomod Air evaporators only operate with Restomod Air A/C controllers. We have several controller styles to choose from. There are literally, hundreds of controller options to operate your Restomod Air evaporator unit.
A/C VENTS
Step 3: This is an optional step in building your A/C kit. If you already own vents you want to use, you can. However, Restomod Air has a vast A/C vent collection to pick from. With over 2199 vent options you are sure to find your style. Restomod Air has options to customize your look by picking any style housing and any style ball with any style finish. Keep in mind the vent prices are discounted when building a kit.
DEFROST ADAPTERS
Step 4: This is an optional step in building your A/C kit. You may already have defrost adapters. If that is the case, ensure that they can receive 2in. duct hose. If you do need diffusers or adapters, we offer a variety of high-impact ABS plastic with a smooth finish that ranges from model specific to universal. These are strong Aftermarket A/C defrost diffusers and adapters designed for 2in. duct hose attachment.
BULKHEAD
Step 5: Connects all your hoses from the interior and exterior of the a/c system. Normally mounted on the firewall these hand-built Hand Burnished finished bulkheads are an eye-catcher in any engine compartment. Our systems are intended to use one of our bulkheads. The hoses provided with the system are meant to take you from the unit to the bulkhead plate mounted on the firewall. A preferred choice with pro builders, the Restomod Air bulkhead is to create a finished look without using rubber grommets on the firewall.
CONDENSER KIT
Step 6: This is an optional step if you already have a 134a compatible condenser and refrigerant hoses for your installation. If not, then you will need to choose a condenser kit for your Restomod Air A/C kit. The Condenser Kit includes a Condenser, Drier w/ bracket, pressure safety switch, enough barrier hose, and misc. black fittings for a standard installation. When choosing your kit the general rule of thumb is to choose a Condenser size closest to the finned area of your vehicle’s radiator opening.
COMPRESSOR & BRACKET KIT
Step 7: This is an optional step in building your Restomod Air A/C kit. If you already have a compressor mounted to your engine, make certain it is a “Sanden brand” or comparable compressor so that it is compatible with our A/C kit. If you do not have a Compressor or compressor mount, choose one that matches your engine size, water pump, and location. We have paired the correct compressor with each mount. Keep in mind that all Restomod Air A/C kits must use a fixed displacement compressor, most OEM compressors are not compatible.


